The Original Screen Tight
Screen Tight Porch Screening Sytem
Screen Tight
You and your family can now enjoy all of the lifestyle advantages of an attractive, open-air screen porch with a perfect, no-sag fit that can be easily installed in hours. Developed and patented by a remodeling contractor who was convinced there had to be "a better way" to design, install and maintain screen porches, the revolutionary Screen Tight™ system has proven itself second-to-none among do-it-yourself homeowners, handymen and professional builders alike.
Conventional screening methods usually consist of staples, which secure the screen, and painted wood lattice, which serves as trim and covers the staples. The lattice is usually replaced each time the screen is repaired. With Screen Tight, the screen is rolled into place similar to the method used by window and door manufacturers. The external cap snaps onto the base component and evenly tightens the screen. When rescreening, the cap temporarily pops off, allowing a quick and efficient replacement.
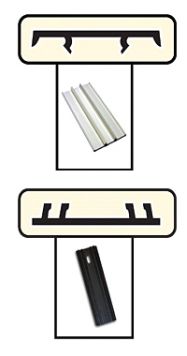
A. Base attaches to a 2" x 4" x 4" wooden frame.
B. Screen spline rolls into the spline groove.
C. Cap snaps onto base.
Ideal for both new construction and remodeling projects, Screen Tight is cost effective and affordable.
The unique Screen Tight system is easily adapted to most screen porches. The base component attaches to existing 2" x 2" and 4" x 4" framing with wood screws or roof tacks. Pre-punched holes on 8" centers result in a quick and consistent attachment. Both base and cap components can be cut with hand held shears. Once the base is attached, the screen is rolled into place with the "Roller Knife" or a standard screen spline roller. The excess screen is cut and removed. The cap snaps into the base completing the installation.
Free of charge, with proof of purchase, during the first 5 years of ownership, Screen Tight will at its discretion replace any product determined to have a manufacturing defect. This warranty does not cover improper installation, misapplication of product, damages or any labor.


WHAT IS SCREEN TIGHT™?
Screen Tight™ is a patented porch screening system designed to eliminate the old cumbersome method of staples, nails, wooden lattice and paint. It provides the maintenance-free qualities of vinyl with the proven method of spline screening that adapts to wooden frame porches.
WHAT TYPE OF CUSTOMER WOULD USE SCREEN TIGHT™?
Screen Tight™ is designed for both the Do-it-yourselfers and professional installers. It can be used on both remodeling jobs and new construction.
WHAT TYPE OF SCREEN WORKS BEST WITH THE SCREEN TIGHT™ SYSTEM?
Fiberglass screen (including Sunscreen) works best in the Screen Tight™ system. Aluminum screen wire will work too.
WHAT SPLINE SIZE SHOULD BE USED IN THE SCREEN TIGHT SYSTEM?
Recommended spline sizes are:
Fiberglass Screen - .175 - Aluminum Screen .160 - Pet Screen - .150
WILL SCREEN TIGHT™ SURVIVE THE ELEMENTS?
Yes! Screen Tight™ is made of an outdoor grade vinyl similar to that used on vinyl clad windows.
IS THE SCREEN TIGHT™ SYSTEM EXPENSIVE?
No! When you add up all the cost associated with the old method (wooden molding, paint, staples, nails, and replacement costs) and compare it to the one-time cost of the Screen Tight™ system, it becomes obvious that Screen Tight™ is the better investment.
WHAT LENGTHS ARE SCREEN TIGHT CAPS AVAILABLE IN?
Screen Tight Base and Caps are 8' in Length
WHAT COLORS ARE SCREEN TIGHT CAPS AVAILABLE IN?
Screen Tight caps are available in White, Grey, Beige and Brown
.
WHY IS SCREEN TIGHT EASIER TO INSTALL OR REPAIR?
Screen Tight uses the spline method of screening which every window manufacturer in the country uses. The screen is rolled into place with spline and a screen roller which is easier than staples and wood lattice.
DO YOU HAVE TO MITER THE BASE AND CAP?
No. Everything is straight cut. No miters.
WHAT TOOLS ARE NECESSARY?
A screen roller for rolling screen and spline, mallet for snapping the cap into place, a utility knife, standard snips or chop saw for cutting and a drill gun for attaching the base.
|
 STEP 2: Roll screen into base. STEP 2: Roll screen into base.Roll screen into base strip with appropriate spline and screening tool. For fiberglass screen use .175" diameter spline. For aluminum screen use .160" diameter spline. Start by rolling the screen into the top horizontal piece of base. After the top is rolled in, then roll the two sides and then the bottom horizontal piece of base. When screening the bottom, create screen tension by pulling down on the screen slightly. This will insure a "tight screen". A screening tool with a plastic wheel works best. Trim all excess screening with a razor knife or a Screen Tight Roller Knife. This will insure that no screen will interfere with the cap snapping onto the base. |
 STEP 1: Attach base to wood. STEP 1: Attach base to wood.Cut base to fit over wood framing. Base strips are butted together and do not require any mitering or notching. Attach the base strip to wood framing using 1" wood or sheet rock screws. Make sure to put a screw in each slot. Fasteners should be snug, but not so tight that the base strip bends. Put a screw no more that 2 inches from the end of each base strip. Do not leave base strips exposed to direct sunlight. |
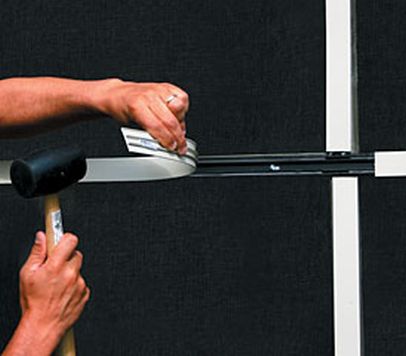
 STEP 3: Snap cap onto base. STEP 3: Snap cap onto base.The cap snaps onto the base strip and serves as the trim piece. Force from a mallet, hand or small block of wood will snap the cap into place. When attaching the 3.5" cap, the inside leg of the cap should be fitted under the base leg before applying pressure. Always attach cap from one end to the other. To remove cap, start at one end and using a screwdriver gently pry the cap from the base. After getting the cap started, it is easily removed by hand. |
